Pages

Monday, April 30, 2012

Embroidery...Drawn Thread Embroidery Follow Up

So I did it! I actually started the edging to that drawn Thread Work I last posted about 

I decided on a satin stitch for the outside edge and it worked nicely. As I went along I found the reverse side looked neater than the front! I have no idea if this is normal? Since this is done on just a plain piece of cotton, I guess there is no stopping me from using the reverse when done? 

Disclaimer: I am not trained in this technique, don't take what I'm doing as "The Law".

Okay now that that is out of the way!

I satin stitched around the edge before moving to the bunching of threads to create the open lacy look. Let's break this down:

What is a satin stitch?

The Embroiderer's Guild describes the satin stitch as:

Working straight stitches closely together across the shape, as shown. Take care to keep the edge even, and if you are following an outline marked on the fabric, take your stitches to the outside of the line so that the marked line does not show.

As you can see from the picture (hopefully!) I used this stitch around the edge of my work to "hold" the threads and keep them from unravelling.


This picture is SUPER blown up. I mean this section is only 1/2" that you are looking at. The quality isn't great, but I wanted you to see a close up of the satin stitch.

Here's a shot of the whole 2 1/2" x 2 1/2" piece.


Now, once that is sewn all around the edge. My next step was to "group" the threads in threes. I found a great example of this in one of my old copies of Creative Needle. I have searched the web for this article so I could link it, but it isn't anywhere. I have scanned it so you can see it and am letting you know....it's from Creative Needle in the mid 90's.


I fiddled and kind of taught myself. I am sure there are mistakes all over the work and I probably didn't do it right- however! Mine looks pretty darn good in person. I was really excited at how nicely it turned out my very first time. You can work on a little piece and give it a try. I bet you'll find it is a tedious but relaxing work to do. The results are impressive and every person who has seen this when I've worked on it at practices, tea shops etc. has exclaimed "wow that's beautiful" Isn't that what you hope for after all your hard work? So I'd say my dabbling in Drawn Thread Work has been a learning experience and rewarding.

I'll leave you with some shots of the work and you'll see what the next blog will be on.

Basic Embroidery stitches.

I have started the Eyelets on the piece and will have that post to you soon. Enjoy and please inbox me if you have questions.


Until next time Dear Reader,

Chatty Cathy


Thursday, April 26, 2012

Embroidery...old school- Whitework


Whitework. The simple look of white on white....timeless.

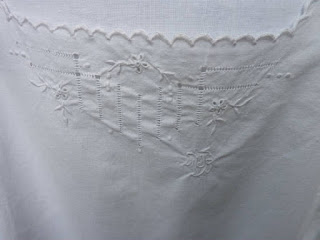
I love linens that are white on white where the attention is drawn the the beautiful simplicity of the stitches. I am dabbling in a type of whitework, more of a drawn thread work.

Drawn Thread work is where one removes the waft and weave of the fabric and then stitches over it to create a grid or design over it.

Here are some examples (I have sited the pictures)


As you can see it's quite beautiful. Now I have done a type of drawn thread work, called Hemstitching, many times over. I HAVE NOT, however, completed a dress front with drawn thread work. I am at the start of said project currently!


Now, find the mistakes...ha ha ha. Where aren't there mistakes? First, it should be worked on even weave fabric, which I do not have. Even weave has the same thickness threads running both horizontal and vertically. Mine aren't and my fabric is a much smaller count. Pulling the threads and cutting has been painstaking work which I did over 2 long nights. Try looking at a bedsheet and then count out 64 thread and don't lose your place...you are starting to understand! I had to count out 3 threads remove them, skip over three threads and then three more...remove them! It's beautiful and still people keep saying WOW! I see the mistakes! Now, from what I read, these accidentally nipped thread will be concealed during the next step. I hope so!

The next step is to buttonhole stitch all around the edge or sating stitch around the edge....I think I'm satin stitching it as the buttonhole stitch gets pulled more and I'm afraid of fraying the edges of this! I have a sinking feeling I'm going to write to you tomorrow explaining the breakdown I had while my hubby sat calming me down convincing me the world won't end just because my hours of thread pulling were simply a  learning experience as to how NOT to do drawn thread work! We shall see :)

I may need to wait till morning with a caffeine drip to bolster my strength to move forward. At this point it looks so neat and it may be the last time it looks "neat".

Wish me luck!

Oh, I am making this into a little sundress yoke for my little niece Jennifer. She is my hubby's pride and joy! He loves her so much and I do too! I want her to have something pretty made by her Aunt Lori in Summerville. I really hope little Jennifer sees this dress someday????

Until next time Dear Reader,

Chatty Cathy

Wednesday, April 25, 2012

Searching for simplicity in a less than simple world.


I have always craved a simpler time, a simpler life. I was literally addicted to Little House on the Prairie. I owned the book set and read them more times than I can count. I also own the entire series on DVD and have watched it since I was little. I also grew up on and still watch The Walton's. I wished for such a simple life, but didn't want to go through the struggles per say. I just wished women could sit and sew and talk. I longed for a quiet life of simplicity. I'm completely sure I romanticized all of it, but there you have it. Growing up I liked doing traditional things with my Grammy, Mama and mom. I learned to sew, embroider, smock, bead etc.

As I came into adulthood and became a mom of 4, I still longed for that simple life. I developed the traditional arts I had been taught as a child and made use of them in daily life. It always gave me pleasure to make something and see the finished results of my labor. To this day I notice a “trend” in most of the things I do, create and think about doing! I always gravitate back to a traditional method. 

For example:
I have a nice sewing machine, but prefer to hand sew. I know you can buy chocolate icing and boxed cake mixes, but make my mother in law’s homemade chocolate cake and icing for my hubby. Yes you can buy cards that are adorable, but I like to print or stamp my own. Yes emails are fast and a perfectly acceptable form of communication, but nothing beats receiving a note or letter via the Postal Service. Yes I could buy a machine hemstitch piece to embroider, but I enjoyed teaching myself hemstitching and work to perfect it. I love traditional things! I always have.

 Some fond memories, as a child, were homemade pizza dough and fresh baked bread. Mom making our Easter dresses EVERY year! Seeing my parents work side by side painting, building and gardening. When they were first married it was due to financial reasons they had to teach themselves these things, but even after dad started to make a good living they continued to do it themselves. There is something very satisfying and therapeutic about doing something traditionally. My mother in law is a weaver. I find that fascinating and would love to live closer to her so she could teach me, alas that isn’t going to happen. My sister in law cross stitches beautifully as do members of my family. On both sides (my husband’s and mine) there are creative people that cherish hand made items and the time and energy they take to make. 

There are many blogs that are “stitching” sites or "quilling" sites etc. I have lacked a focus for my blog. I say how I feel sometimes. I show a tutorial sometimes. I have thought about all the women over the years that I had the pleasure to teach crafts of all sorts. Heirloom sewing, English smocking, painting, woodworking, gardening, quilling, stamping, scherensnitte and so much more. Moving so many times has allowed me to meet women all over the coast and share skills they didn’t know beforehand. I think from now on, even if I don’t have step by step tutorials, I am going to share with you a little of my life, yes, but mostly focus on simplicity in life and cherishing the traditions and lost arts. I’d love feedback from anyone who is reading (Are you there?) to get a sense as to whether that is something anyone is interested in? What is candle wicking and how the heck do you do it? My blog will show you! What do you all think?

Until next time Dear Reader,

Chatty Cathy

Tuesday, April 24, 2012

The simple Macaron


The simple Macaron.

I have read for so long how hard these were to make and then a couple of weeks ago my mom made some on her blog:

I had intended on making them and just never got around to it. She made it look so simple. I decided to go for it. Went to buy the almond flour and that's as far as I went! $11.50 for a small bag of almond meal/flour. Oh goodness. Not happening...I'm too frugal. Funny how we'll spend money on some things and not others. I'll drop perfectly good money on my favorite olives, yet almond flour was a no no. Maybe because I cannot grow olives, but I was pretty sure I could grind my own almond flour?

I researched. Almond flour is just ground blanched almonds. You can even use any almond! Well now, I can do that! I went to Whole Foods (lucky me to have one...almost and hour away! It's a rare treat to go) to check out the price of almond flour knowing that would be a more "normal" item there rather than a "luxury" item at the regular grocery store. The price WAS slightly lower than the grocery store, but still more than I planned on spending.

I went over to the bulk food isle and there, there was my answer. Blanched slivered almonds at $5.95 a POUND! WAY cheaper than the flour! When you grind whole things they tend to "fluff" up, so I knew it would make a great deal.


I added small amounts to my blender and pulsed. It made a fine "meal". Don't pulse to long or the natural fat in the almond releases and cakes it up. When I had a bowl of meal I added the correct amount of meal and confectioners sugar to my food processor and pulsed that till I had a very fine flour. I then passed it through a mesh strainer 2x's so I had a super fine flour. It sounds more laborious than it actually was.

The rest was so easy! There are so many tutorial on the web. I found this one to be the best:


Here are my Macarons.

Aren't they cute? Notice the "feet" on them? That means I did it correctly!!!!


Now aren't they cute? All this being said. My hubby loved them, I'm sure the kids will love them, but I think they are too sweet. I'm more a veggie girl and baked goods are not something I go gaga over. I could eat one or two, but a plate full would make me feel ill. My hubby downed about 12! They must be good?

Until next time Dear Reader,

Chatty Cathy


Wednesday, April 18, 2012

Fairy Garden


I have seen Fairy Gardens all over the web, mine is nothing special except for the fact that my 12 year old daughter Kimmi and I bonded and had a special time making it. In my book....that's enough to make it the most special Fairy Garden!

Being the 4th in a line of girls and seeing that those 4 girls were all born in a 5 1/2 years span of time, life hasn't been easy as the baby. Sure she's cute, gets her way, gets out of work sometimes, but she also gets left behind, gets hand me downs all the time, is told to "be quiet", "Don't follow us", "Don't bug us" and many more helpful things by her sisters! Sometimes the littlest wants to feel loved and as important as the older ones! We have our garden in the side yard in full swing now. Things are growing like mad and we have started to harvest as well. Kimmi helps with the garden, but the 16 year old (2 kids up from Kimmi) has made it her "special project". She didn't mean for it to become "her" garden, she's just thrilled to live in a home where we can have a garden again and is so excited! In  turn Kimmi has felt like she has "nothing that's her own!" Now realize that is a bit of an exaggeration, but her feelings are valid and I respect them. So I came up with a great idea (stolen from the millions on the web). I suggested a Fairy Garden, this intrigued her and she started grilling me about would it be HERS? I said part of a family and the joy of being in a family is to share wonderful things but that she could make it alone with me. This seemed to satisfy her. Now I thought this would be a very cheap project....ha ha ha!

Succulents are about $3 a pop at the garden center so I have to say this project ended up costing about $12 in plants. I guess in the grand scheme of things the same amount of time spent out doing something would have cost more and then there's just the memory, this way we have memories and something to look at daily. I'm glad we did the project.


Here's a top view of the garden. I used an old enamelware baking dish for the garden and filled it with a compost and peat mixture. (black hen) We used Irish moss (which gets little white flowers!), succulents a cactus (Kimmi is fascinated by them) and some gravel sold in little bags near the orchids!

The small bench, fence, arbor and mushrooms were made by yours truly and my wonderful hubby wound wire around the little pickets for me. 


Kimmi thinks the plant to the right looks like a sea anemone. It does!

Here she is surrounded by messy stuff... which she cleaned up as she promised!


She was very happy and really enjoyed the bonding time we had together.

I encourage you to explore the web. Google images of Fairy gardens and see how many ideas are out there and try one yourself. It was so much fun and kids love it!

Until next time Dear Reader,

Chatty Cathy


Monday, April 16, 2012

Paschal Basket Cover

So Orthodox celebrated Pascha Saturday night into Sunday morning and one big part of the celebration for Pascha is the Pascha basket. It is filled with all sorts of goodies that the Orthodox fast from during the Lenten period. 40 days to be exact! Easter and Pascha are not always celebrated at the same time. Western and Orthodox celebrations of Easter (Pascha) vary in certain ways. Usually Orthodox and Western Christians celebrate Easter on two different Sundays. The reason is that Orthodox churches still base their calculation of Easter's day on the Julian calendar (in use at Christ's and early disciples time), whereas Western churches follow the Gregorian calendar (which came about much later). In order to keep the date of Easter on a Sunday, the date changes yearly based on the Paschal full moon. The possible date range for Western Easter day is March 21st-April 25th. 
My dear friend Meg lives in Virginia Beach where I lived up until this past year. We looked forward to going around and shopping for items for the Paschal basket together each year. I am now here in SC and wanted to make something special for my dear friend Meg. She gave me a cross a few years ago that reminds me of her every time I wear it. I wanted to make something special for her so that she would remember me every time she used it. I came up with a Paschal Basket Cover for her basket. I found the design on an old archive page of DMC. I transferred it and then set to work on deciding what colors and stitches to use as I only had a line drawing at this point! I spent 114 hours on the embroidery and this is the final result.


I used DMC flosses and my wonderful husband bought me an Ott light with a magnifying glass attached! I used the 50% off coupon of course but it was still a large purchase for me as I don't spend money readily. It helped so much with the detail work! For the center and wheat sheaves I used a gold thread. The lilies are done in silk. Here's a picture of the center detail. Oh and these close ups were taken before washing the pencil lines out so don't think I sent it off like that! 


After the embroidery was complete I inserted the piece in a purple linen background. I backed it with the same linen. I was quite happy with the results and my friend loved the gift!


I hope each of you enjoyed your Easter and Pascha and wish you a wonderful week!

Until next time Dear Reader,

Chatty Cathy


Sharing with: